HOMEMADE PEROGIES FROM SCRATCH!

“Food is our common ground, a universal experience.” –James Beard

Life hasn’t been all sunshine and rainbows lately. I know this global pandemic raging over the world has taken away everyone’s ability to move freely and enjoy the comforts we once took for granted, dining out included. For me personally, I feel like I am in a constant state of limbo unsure of what the future may hold or when self-isolation and social distancing will end. Turning to comfort foods that both keeps my mind busy and nourish my soul has been a great escape from this new reality.

Perogies for me are one of those comfort foods that take time and patience to prepare but always manages to soothe the mind and soul. They are also great if you want to batch make something to keep in your fridge so you can enjoy them over the course of a week or want something relatively inexpensive to give to someone in need. During this time we must all be a little bit kinder to ourselves and to others, and giving someone a home-cooked meal is a great way to show you still care even when you can’t be there physically. Whatever your purpose for making them, I hope they bring you the same happiness and enjoyment as they have brought me. Stay well!

INGREDIENTS:

Serving: 6 People @ 5 Perogies Each,

- Cheese and Potato Perogies: Filling-
1 1/2 LBS of Russet Potatoes (typically around 2-3 potatoes should suffice) - peeled and chopped into 1-inch squares
2 TSP of Olive Oil
1/2 a CUP of Onion (diced)
1 Clove of Garlic (minced)
1/2 CUPS of Cream Cheese
1/2 TSP of Salt
Pepper to taste

- Dough For Perogies -
2 1/2 CUPS of All-Purpose Flour
1/2 TSP of salt
1/4 CUP of Sour Cream
1 Egg
2/3 CUP of water

-What To Serve With Perogies - Optional Toppings -
Bacon
Chives
Sourcream
Caramelized Onion


CRAVING COMFORT FOOD? CHECK OUT THESE OTHER RECIPES!


HOW TO MAKE PEROGIES:

First, we need to make the filling.

Put your cut up potatoes in a pot with lukewarm water, add salt and bring to a boil.

In a pan, drizzle a little bit of olive oil and allow it to heat up on medium. Once hot, add in your chopped onions and allow them to cook until they become translucent. This may take 3-5 minutes and you may want to reduce the heat to ensure they don’t burn.

Add in your garlic to the onions when they are close to being done (garlic cooks faster than onion).

Once the potatoes are ready, strain the water out and place the cooked potato back in the pot before starting to mashing them into a smooth texture. To help you make them creamier, add in your cream cheese.

When onions and garlic are ready, add them to the potato pot as well, mix until well incorporated, salt and pepper to taste, and set aside to cool down to room temperature.

Dough For Perogies

Next, we need to make the dough.

Add flour and salt into a large bowl and mix until well combined.

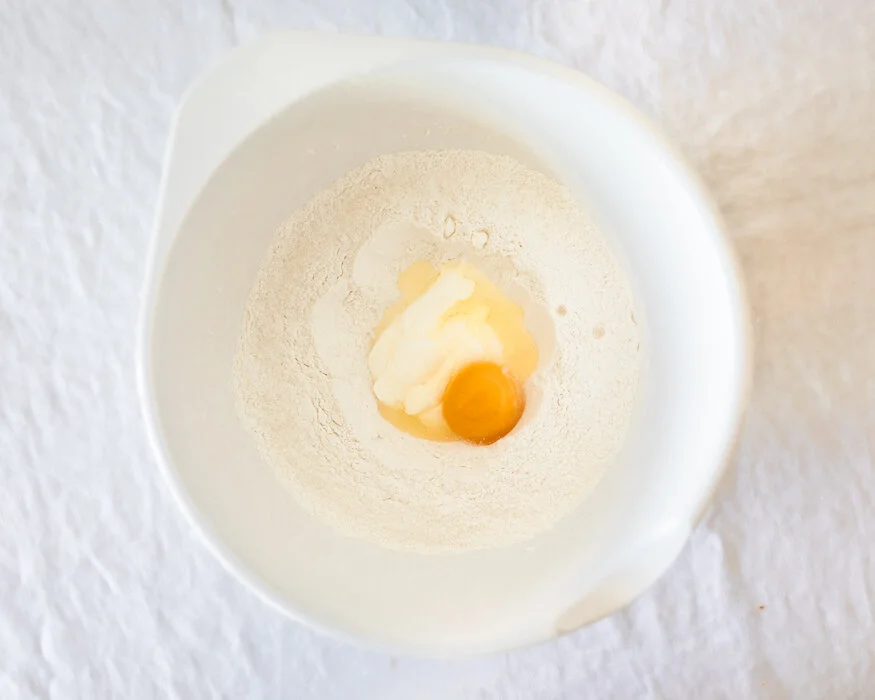
Make a well in the middle and add in your eggs, water, and sour cream. Using a fork or spoon start to mix it together starting from the inner circle and working your way toward the outer edges. You may need to eventually switch to using your hands.

Once the dough starts to form, use a countertop to knead it till it isn’t powdery and has a smooth texture. Place dough back in the bowl, cover with a cloth and let sit for 10 minutes.

After 10 minutes, flour a working station and roll out 1/3 of the dough till it is 1/8’ in thickness. Cut out circles using a circle cookie cutter with a 4’ diameter. You can also use a lip of a cup as a stencil and a pizza cutter if you don’t have a circle cookie cutter! Feel free to get creative! If you don’t have a 4’ wide diameter cup you can always roll out the dough a little thicker, use a 3’ wide diameter cup and then roll them out a little thinner after to spread out the dough wider. It doesn’t have to be perfect.

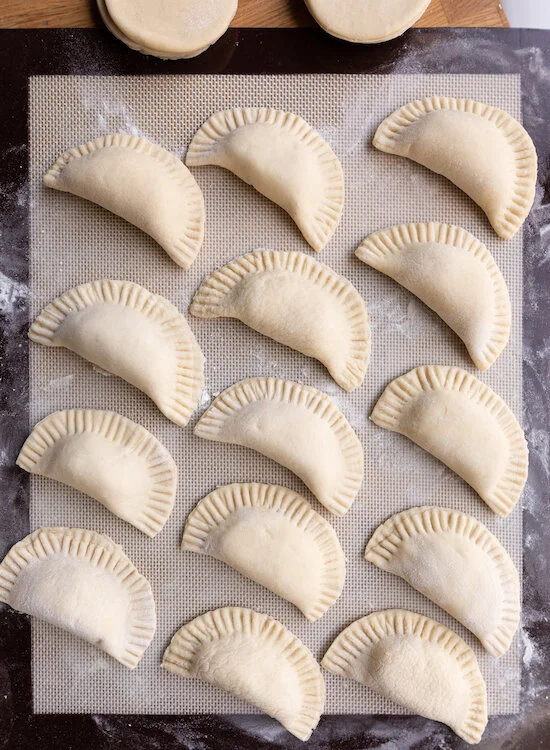
Set dough pancakes aside on a floured surface and cover with a cloth. Once you have a few cut out, fill the middle with about a tablespoon of the mashed potato filling and fold the dough over, pinching the sides to create a seal. If the seal doesn’t hold use a little water along the edge to help. Secure the seal by pressing the prongs of a fork along the dumpling edge and making indents into the dough.

How To Cook Perogies & How Long To Boil Perogies

Once you have a few complete, boil a pot of water. Once boiled, add salt and drop in 3-4 dumplings. You will need to stir the water at first so they don’t stick together. Eventually, after 3-5 minutes the Perogies, will float to the surface of the water, when that happens, allow them to cook for an additional 30-45 seconds before taking them out of the water and setting them aside on an oiled tray or casserole dish. As you add more cooked perogies to the oiled tray or casserole dish, make sure they are covered in olive oil to avoid them sticking to one another. You can store them like this for a few days in the fridge if you don’t want to eat them right away.

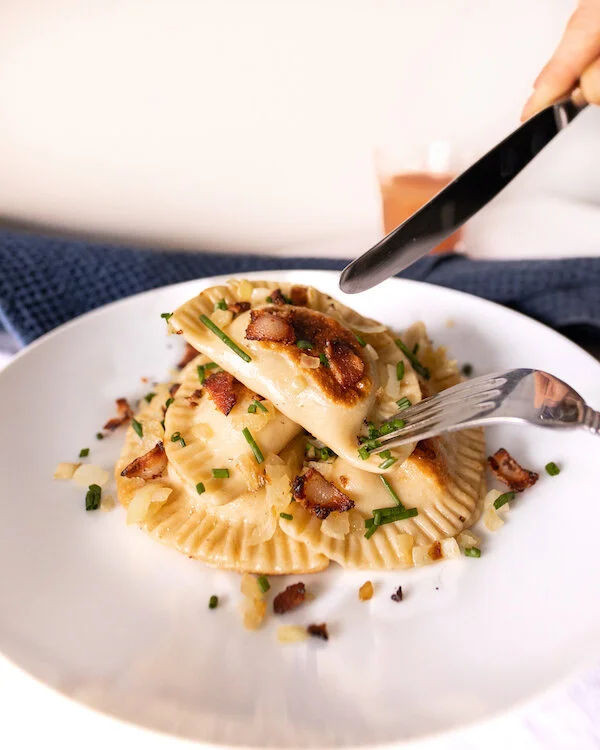
I like my perogies fried so typically I will heat up some butter in a pan on medium and once hot, place a few of these finished, pre boiled perogies in the plan flipping them as they become nicely browned. When ready, remove them from the pan, add a dollop of sour cream, chives, and bacon bits and serve!

Pierogies in Air Fryer

You can also air fry pierogies in an air fryer if you have one! It usually only takes 4-5 minutes to get them crispy and golden brown but I have found that each air fryer I have tried them with is a little different so just keep an eye on them. Typically 4-5 minutes though is good!

Enjoy!


FOLLOW ME ON INSTAGRAM @ISTHATSOH


If you like this recipe for perogies with bacon or have any comments/questions about how to make homemade perogies or suggestions as to what to serve with perogies, feel free to leave them in the comment section below!


PIN THIS POST

HOMEMADE PEROGIES FROM SCRATCH.jpg Perogies - how to make perogies, homemade perogies

RECIPE REVIEW: SHEET-PAN CHICKEN WITH CHICKPEA, CUMIN AND TURMERIC

I was first introduced to this NY Times Sheet-Pan Chicken recipe during a dinner party with a girlfriend and couldn’t get enough. I ended up taking a copy of the recipe home eager to try it myself and not only was it so easy to remake, but it tasted just as good as the first time. I love the mix of flavors and spices, and how the yogurt breaks through the acidity. If you want to make it vegetarian and just leave out the meat, I’m sure it would be just as tasty! Either way, Adam told me I can definitely make it again so not only does this recipe get my approval, but it gets his too!

Score: 4.5/5

INGREDIENTS:

 Serves 4 People

-Chicken and Chickpea-
4 LBS of Chicken (I prefer to use dark meal like thighs) bone-in and skin-on.
Lemons for lemon juice - need to yield 5 TBSP total (2 for chicken, 2 to marinate slaw, and 1 for yogurt)
1.5 CUPS of full-fat Greek yogurt
2 TSP of Turmeric (1 TSP for chicken marinade, 1 TSP for seasoning later)
1 TBSP of Fennel Seed
1 TSP of Cumin (ground)
2 Cans of Chickpeas (drained and rinsed)
1 Large Red Onion - sliced thinly
1 Mini Cucumber - sliced thinly
Olive Oil
2 TBSP Water
Salt and pepper to taste

-Toppings-
Feta (optional)
Fresh Mint - torn into small pieces

DIRECTIONS:

 Season chicken using salt and pepper before creating a marinade using 3/4 CUP of yogurt, 2 TBSP of lemon juice, 1 TSP of Turmeric, and 2 TBSP of water. Add more salt and pepper if necessary, it should be slightly salty, this will reduce once cooked and combined with yogurt topping later.

Add seasoned chicken to marinade and make sure it is coated evenly - allow to sit for a minimum of 30 minutes at room temperature or overnight in the fridge.

Prior to cooking, adjust the oven rack to the top shelf and heat oven to 450!

Next combine chickpeas, fennel seed, cumin, and the remaining Turmeric in a bowl with half the red onion slices, drizzle with olive oil and season with salt and pepper before giving it a good toss to make sure it is covered evenly. Place on a rimmed baking sheet and push chickpeas to the outer edge to make room for chicken.

Scrape the excess marinade off the chicken and place it in the center of the baking sheet. Bake in the oven for about 45-50 minutes until skin is browned. You will need to toss chickpeas occasionally to make sure they become crispy and golden and don’t burn

While the chicken is cooking create a slaw by tossing the remaining onions in a bowl with the thinly sliced cucumber and add 2 TBSP of lemon juice. Season with salt and pepper and let sit in its juice.

Once the chicken is ready, remove from oven and allow to cool slightly. Add onion cucumber slaw, to remaining yogurt and top with 1 TSP of fresh lemon juice. Season with salt and pepper to your taste. Top chicken with yogurt and garnish with mint and feta.

Enjoy!

To check out the original recipe, click HERE!


If you like this recipe or have any comments/questions, feel free to leave them in the comment section below!


PIN THIS POST

SAVOURY FLAKY SPANAKOPITA BITES

Spanakopita-6 2.jpg

I was craving some flaky spanakopita the other day and decided to test my hand at baking it myself at home. Adam’s Baba (grandmother) makes an amazing Macedonian version called Zelnik so naturally, she was the first person I called. These little spinach pies ended up turning out amazing even though I sort of freestyled some of the measurements and combined Baba’s recipe with a couple of others I found. I mean, you can never have too much cheese, right!?

INGREDIENTS:

Serving: 24 Spanakopita Bites

-Spanakopita Filling-
Olive oil
1 Medium Sweet Onion chopped finely
6 CUPS of Fresh Spinach chopped roughly
3 Springs of Green Onions, sliced into thin pieces
2 CUPS of Italian flat parsley chopped finely
2 Cups of Goat and Sheep Feta
1 CUP of freshly Grated Halloumi Cheese
2 Eggs beaten lightly
Salt and Pepper

-Phyllo Cups-
1 (454 Grams) Packet of Phyllo Sheets*
3/4 CUPS of Melted Unsalted Butter
1 Egg beaten lightly

*Phyllo Sheets - Make sure that the phyllo dough is completely thawed.  It is super fragile so if it is not well thawed out it will break easily.  In general, be extra gentle when handling each layer of phyllo because it is so thin it will tear easily. You have to work a little fast because the dough drys out quickly. I first cut the phyllo layers into rough 4” squares using a scissor and stacked them to keep the air off them as I worked. You can also keep them under a slightly damp dishtowel. Work with one muffin pan at a time.

DIRECTIONS:

Spanakopita.jpg

Butter your muffin trays making sure to coat the bottom of each cup and the sides

In a pan add in olive oil and finely chopped onion and saute until translucent.

In a large bowl add the sauteed onion with finely chopped parsley, spinach, green onion, eggs, crumbled feta, and Halloumi. Add a pinch of salt and pepper and combine thoroughly till well mixed. Set aside.

Preheat oven to 375 degrees and pull out your muffin trays. It’s time to create your pastry cups.

Add one 4” phyllo square to each buttered muffin cup mould on your tray pressing each sheet into the moulds and allowing the corners to point up. Little tears may occur -don’t worry to much about this! Just make sure on the next layer to cover the tear with some phyllo. Using a pastry brush, brush each phyllo sheet with butter before adding another 4” phyllo square on top. Do this until you have cups that are 5-6 layers thick.

Spanakopita-2.jpg

Once complete, fill each cup with spinach mixture and fold over phyllo corners back towards the middle to create a cover. If they have died out, try brushing them with butter to help moisten them. There will be some flaking, don’t worry so much about it.

Spanakopita-3.jpg

Mix the last beaten egg with remaining butter and brush the top of each muffin mould with the mixture to help keep the phyllo sheet corners together before placing muffin tins in the oven and baking for 35 to 40 minutes or until the top is golden

Once ready, allow muffin trays to cool for 10 minutes before trying to transfer cups onto a serving plate or cooling rack.

Enjoy!


If you like this recipe or have any comments/questions, feel free to leave them in the comment section below!


PIN THIS POST

MUSSELS ARRABBIATA (SPICY TOMATO SAUCE)

One thing my brother-in-law and I have in common is our love for all-you-can eat mussels. When it comes to who can put down more bowls of mussels, I’ve got some stiff competition. Almost every time I go to visit him we always go to this restaurant that runs a ‘bottomless mussels’ special on Tuesdays and when they see us walk in they know, IT’S GOING DOWN!

The last time I visited though, I suggested trying our hand at making mussels at home. At the time I had also been craving something with a spicy arrabbiata sauce and I thought the flavors would pair really nicely with mussels (very similar to mussels marinara). So why not hit two birds with one stone!? Dinner that night came together beautifully, and I loved how well my new mussel recipe turned out. Needless to say, there were ZERO leftovers and being a self-proclaimed ‘mussel connoisseur’ I’m definitely giving myself a pat-on-the-back for this one!

To all my seafood lovers out there, this one is for you!

Buon Appetito!

INGREDIENTS:

 Serves 2 People

-Seafood-
4 lbs of fresh mussels – rinse, scrub and debeard. (I usually buy extra because I know that some are going to be bad)

How to buy, store, and prep fresh mussels:

When buying fresh mussels, make sure to smell them - they SHOULD NOT have a strong odor! You also want the shells to be shut. Since mussels are alive if you bang the shells or apply pressure and close them yourself, if they are indeed alive, they should shut or remain shut. If they open once again right away it means that they are weak/not fresh, so don’t buy those. Make sure to store your mussels in the fridge, they need air to breathe so don’t use a sealed container, instead place a damp cloth over them like a napkin or paper towel to provide further moisture. Before you are ready to use them make sure to rinse the shells, remove the beards or hairy bits, and scrub away any debris off the shells.

-Arrabbiata Sauce-
3 tbsp of olive oil
1 small sweet onion - chopped finely
2 cloves of garlic - minced
1-2 dashes of hot chili flakes (as desired)
2 800g (28oz) cans of peeled tomatoes (Roma / San Marzano)
2 tbsp of fresh basil, chopped roughly
Salt and Pepper to Taste

-Toppings-
Fresh Italian Basil

-Extras-
Baguette


LOVE SEAFOOD? CHECK OUT THESE OTHER SEAFOOD RECIPES!


HOW TO MAKE MUSSELS ARRABIATA:


In a deep skillet or Dutch oven, add olive oil and let it heat up on low to medium heat.

Once hot add onion to skillet and let sweat for 3-5 minutes. Add garlic and continue to simmer, stirring occasionally.

Once onion and garlic are translucent add in your chili flakes and continue to cook, 1-2 minutes.

Next, add in your roughly chopped fresh basil and both cans of tomatoes. Chop up any large tomato bits.

Add salt and pepper and mix thoroughly before covering and simmer at a low temperature for 30 minutes, stirring periodically. After 15 minutes add more salt and pepper to desired taste, if needed, then cover and let the sauce continue to simmer.

Place mussels in the skillet or Dutch oven and mix until fully coated in the simmering sauce. Cover and allow mussels to open/cook for 3-5 more minutes

Once all the mussels appear to be open and cooked, place in a bowl, garnish with fresh basil and serve!

Enjoy!


FOLLOW ME ON INSTAGRAM @ISTHATSOH!


If you like this fresh mussels recipe or have any comments/questions about how to cook mussels, feel free to leave them in the comment section below!


PIN THIS POST

BAKED ITALIAN KETO MEATBALLS!

Keto Meatballs Small.jpg

My mom and I have been on the keto diet for over a year and we are always looking for new keto-friendly recipes to fit our keto-lifestyle. About a month or two ago my mom found this old ‘baked Italian meatball’ recipe on the internet and we decided to give it try, with a couple of our own keto-friendly twists of course. That evening when we sat down to dinner we could not believe how juicy and delicious the meatballs were, and the sauce - a little spicy but so flavorful. For the next three weeks straight we started a Meatball Monday tradition because we honestly couldn’t get enough! My mom and I love this recipe so much we figured It wasn’t fair for us to keep it all to ourselves, so here it is my keto loving friends! I’ve written it out so you can enjoy it too!

Buon Appetito!

Keto Meatballs Small-2.jpg

INGREDIENTS:

-Meatballs-
1 lbs of medium (15-20% fat) ground beef
2 Italian pork sausages - casing removed and chopped
1 cup of Parmesan - grated
1.5 cloves of garlic - minced
1 cup crushed pork rinds
1 Egg
2 tbsp of fresh, chopped Italian parsley
Salt and Pepper

-Sauce-
3 tbsp of olive oil
1 small sweet onion - chopped finely
2 cloves of garlic - minced
1/2 tsp of oregano
2 tbsp of fresh basil, chopped roughly
1-2 dashes of hot chili flakes (if desired)
1 - 800g (28oz) can of peeled tomatoes (Roma / San Marzano)
Salt and Pepper to Taste

-Toppings-
Fresh Parsley
Parmesan Cheese

-Extras-
Baguette

DIRECTIONS:

Mix all meatball ingredients in a large bowl and form 7-8 large meatballs. Place meatballs on a tray covered in parchment paper and store in a cool place.

In a deep skillet or dutch oven, add olive oil and let it heat up on low/medium heat.

Once hot add onion to skillet and let sweat 3-5 minutes. Add garlic and continue to let simmer stirring occasionally.

Once onion and garlic is translucent add in your spices and continue to cook 1-2 minutes.

Add in the canned tomatoes and chop up any large tomato bits. Mix thoroughly before covering and allowing to simmer at a low temperature for 30 minutes, stirring periodically.

After 30 minutes of simmering pre-heat oven to 350F.

Place meatballs in the skillet or dutch oven on top of the simmering sauce. Sprinkle with a little more Parmesan cheese and add in fresh thyme.

Bake (no lid if you are using a dutch oven) for approximately 20-25 minutes turning meatballs over half way.

Sprinkle with remaining Parmesan cheese and serve immediately.

Enjoy!


If you like this recipe or have any comments/questions, feel free to leave them in the comment section below!


PIN THIS POST