CURRIED BUTTERNUT SQUASH SOUP - VEGAN , VEGETARIAN

My boyfriends mom made this soup for me recently and I was instantly in love. It is so flavourful and delicious. I am a big fan of Indian food and curry so if you are too you should try this curried butternut square soup. There is a little bit of apple in it so it tastes a little sweet and is great if you have a kids. Oh, did I also mention its vegan/vegetarian friendly? That's right!!! There is no dairy so its great if you are on a diet and looking for a meal that will warm you up as well as fill you up guilt free.

INGREDIENT

4 TBSP of Butter (or vegan substitute)
1 Large Yellow Onion Chopped finely
5 TSP of Curry Powder
1 Butternut Squash (around 3lbs) peeled, seeded and cubed
2 Apples peeled, seeded and cubed
3 Cups of Chicken Broth
1 Cup of Apple Juice
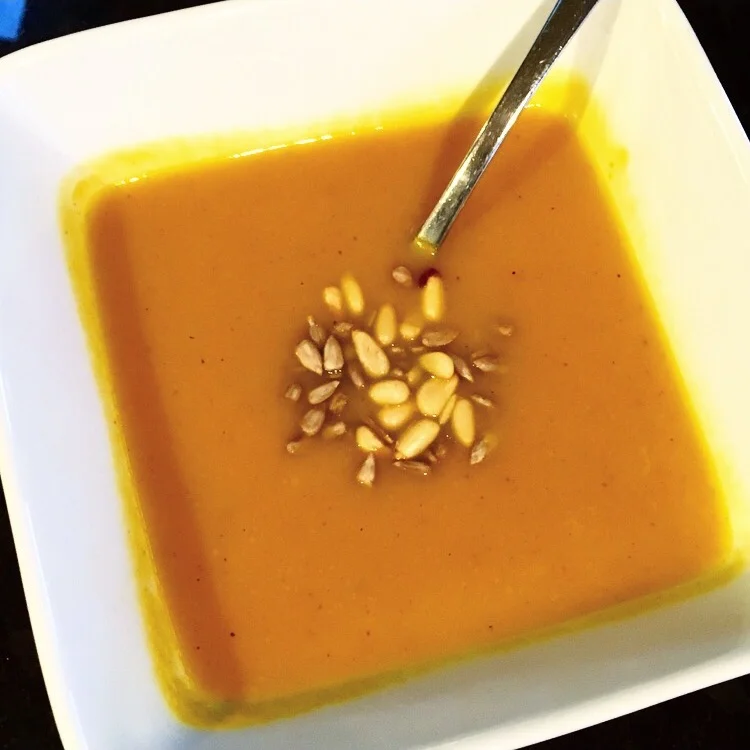
Sun Flower seeds and Pine nuts (to garnish)

MATERIALS:

Blender of Food Processor

DIRECTIONS:

Melt the butter in a big soup pot. Add in the onions and curry powder mix together all the ingredients and let simmer, lid on, on low heat for about 25min.

Once the onions are soft and translucent add in the butternut squash and apple followed by the chicken broth. Mix the ingredients around and bring to a boil. Once boiling reduce the heat to a simmer and continue to cook until the butternut squash becomes tender. About 30 minutes

Once the butternut squash is tender transfer in parts to the blender or food processor and blend to puree consistency and transfer back to the pot. (Sometimes draining out the chicken stock before you put it in the food processor can help, however don't forget to add the chicken stock back into the pot afterwards.) 

Add in the apple juice and stir. Salt and Pepper to taste (I think it only needs a bit of pepper)

You can continue to let it simmer with the lid off if you think its to watery and let some of the water evaporate but stir every once and awhile.

You can toast the pine nuts and sunflower seed and add them as garnish before you serve!


I hope you enjoyed this recipe! I would love to hear from you and your thoughts on the taste. Please feel free to leave a comment below :)


QUINOA TABBOULEH - GLUTEN FREE, VEGAN, VEGITARIAN, SOY FREE

TABBOULEH traditionally is made with bulgur wheat or couscous. I made this recipe using quinoa as a substitute for its health and gluten free attributes and lets get real it taste pretty much the same. I really enjoy Tabbouleh salad as it goes with just about everything. Its also really good to keep in the fridge as a healthy snack and the Quinoa is a slow digesting carb/protien mix that makes you feel fuller longer - BOOM! 

INGREDIENTS:

1 Cup of Quinoa
2 Bushes of Parsley (cut off stems and mince)
1 Bush or 3/4 Cup of Mint (cut of stems and mince)
3 Medium Tomatoes
1/2 a Large Onion
3 Cloves of Garlic
Lemon Juice
Olive Oil
Salt and Pepper to taste

DIRECTIONS:

Measure out 1 cup of Quinoa and add it to two cups of water. Bring the water and quinoa to a boil then cover the pot and reduce the heat to a simmer for an additional 15 minutes.

In the meantime go ahead and wash, dry and mince your Parsley and Mint. Add it to a large bowl.

Next chop the Tomatos in quarters and remove the seeds. Once the seeds are removed chop the tomato quarters down into small "pinkie nail" sizes. Add the chopped tomato to the bowl with the parsley and mint. 

Now you can chop the Onion into about the same size as you did the tomato and add it to the bowl.

Next you can mince the Garlic and add it to the bowl with the parsley, mint, tomatoes and onions.

Your quinoa should be done by now. If it is remove from heat and let cool. You don't want to add it to the bowl until it has completely cooled down.

While it is cooling you can juice the Lemons. I think I juiced about 5-6 lemons to yield about 1.5 Cups of juice.

Once the Quinoa has cooled down add it into the bowl with the other ingredients followed by the lemon juice. You can also add 2 TBSP of Olive oil and mix all the contents of the bowl together. You can add salt and pepper at the end for taste as well as more lemon juice if you fancy it.

Can you dig it???? Whats your take on Tabbouleh? Has anyone ever toasted their Quinoa before cooking it? Not sure how I feel about the taste. Share your thoughts by commenting.
 

This post was inspired by Tori Avey of http://toriavey.com/ She is one of the food blogs I always like to follow and be inspired by.

PERSIAN COOKING - BASMATI RICE WITH TADIG! VEGITARIAN, GLUTEN FREE, SOY FREE

If you have been to a Persian restaurant before you have probably had Persian basmati rice but have you had Tadig? Tadig is a crispy/cracker like layer of rice that can be found at the bottom of the pot and is something that my siblings and I fight over at dinner. Often Persian restaurants don't serve Tadig because in order to yield larger amounts of rice quickly they steam the rice which cooks it evenly and therefor doesn't produce Tadig. Cooking the rice in the traditional matter allows this crispy layer to form at the bottom which you later top the rice with before you serve. Once you get really good at making Tadig you can take it one step further and add in potato slices for extra flavor and decoration.  

INGREDIENTS:

3-4 TBSP Salt
3-4 Cups Basmati Rice (enough for 9-12 servings)
1/2 Cup of Butter
A pinch of Saffron
1-2 TBSP Olive Oil

DIRECTIONS:

Fill a pot with water and bring to a boil. You only need enough water to cover the amount of rice you are cooking plus another two to three cups.

While you are waiting for the pot of water to boil wash the rice in warm water, drain and repeat until the water becomes clear.

When the water in the pot starts to boil add in the salt and let boil for a minute then add in the rice and let the water continue to boil on high for 5 minutes.

While the rice is boiling melt butter in a small pot using the stove or in a bowl in the microwave. Grind the Saffron into a powder using a mortar and pestle and add it to the melted butter. Once the butter is melted add the saffron to it and mix together.

After the five minutes are done add warm water to the pot over the sink so the water overflows and all the starch sitting on the top of the water overflows out and over the rim.

After the starch is gone drain the rice into a colander (strainer). Place the pot back on the stove and add about 1 TBSP of olive oil to lightly coat the bottom of the pot. Add the rice back into the pot and mold the rice into a pyramid formation. Make four holes/tunnelsin the top of the pyramid that go all the way to the bottom of the pot using a chip stick or a knife and pour the melted butter and saffron down those holes. You can also save some butter and saffron and remove the top of the pyramid, dress the flat area with some butter and saffron and then replace the removed rice back on top.

Cook the rice for an additional 8 minutes on medium heat. Make sure the lid is tightly on so that the rice can steam. Check periodically to make sure there is no burning smell otherwise your stove may be too hot and you may be burning your tadig and the whole rice will taste burnt later - if this is the case turn down the heat.

After the 8 minutes are complete turn the temperature down even more to the lowest heat on your stove and let the rice continue to cook for 35 minutes.

After the 35 minute are complete the dish is ready to be plated. First empty the pot of the rice and then scrape and dig along the harden rice cracker bottom to release the tadig. Place the tadig on top of the rice with the browned side facing up.


The first time I tried this I did not succeed. I think I added a little to much oil to the bottom of the pot because I tend to "free pour" so do not worry it does take practice!!!

Have you done this before? Share your experience! I'd love to hear about your kitchen adventures.
 

Recipe Credit goes to Nurse Amanda

MANGO PEACH FRUIT ROLL UP - PLANT BASED, ORGANIC, GLUTEN FREE AND NO SUGAR ADDED

ACTUALLY the easiest thing to make on the planet. As a kid I loved fruit roll-up but as an adult I look for more healthier alternatives. Anyone can make a more natural fruit roll-up at home, all you need are the following:

INGREDIENTS:

FRUIT (I used 2 Large Mangos and 2 Peaches)

DIRECTIONS:

Cut the fruit up and place it in a blender till it is liquefied.

Pour the liquefied fruit on a banking sheet with wax paper or a non-stick baking mat. Spread the liquefied fruit out evenly using a spatula. Aim for about 1/8 to 1/4 inch thickness.

Bake at 175 Degrees for 3-4 hours. If it is thicker you will need to let it bake for longer. If you have a lot of liquefied fruit you can use two trays or just put it all on one and bake for longer (could be up to 12 hours to fully dehydrate)

**its actually not cooking the fruit at this temperature it is only dehydrating it of its water content which leaves the natural sugars behind to create the fruit roll up! This can be used for most fruit except for anything that is made of 80% juice like citrus fruit. Berries, mango, peaches, pairs, plums, apples and kiwi's work best


CAULIFLOWER BUFFALO WINGS - VEGAN, VEGITARIAN, SPICY ! GLUTEN FREE AND SOY FREE

I found this recipe one night while surfing the net and thought I'd give it a go. I can't say that I'm vegan (even though you have probably noticed most of my recipe post are vegan) but I do like eating health. I give myself a cheat day once a week and usually those meals involve meat and dairy, sometimes at the same time. One thing that is for sure is that I have a deep love for spicy chicken wings and this might just be the healthier version I have been looking for...

INGREDIENTS:

1 Cauliflower, break bite-size pieces (half is good for one person)
1/2 cup Quinoa flour (original recipe called for garbanzo bean flour)
1/2 cup water
1 teaspoon garlic powder
1/2 teaspoon salt
1 teaspoon melted butter (or butter substitute for my vegan friends)
2/3 cup hot sauce

DIRECTIONS:

Preheat oven to 450ºF. Next combine flour, water, garlic powder, and salt in a bowl. Whisk together until smooth. This is your batter!

Toss the cauliflower into the batter until they are completely coated and place the battered cauliflower on a greased, nonstick baking sheet. When the oven is ready bake for 8 minutes, toss and then bake for another 8 minutes.

While that is baking you can combine the melted butter and hot sauce into a bowl and mix it together. When the battered cauliflower is done, remove it from the oven and gently toss it in the hot sauce mixture. Place fully coated cauliflower back on the baking sheet, if there is any left over hot sauce in the bowl I like to drizzle it over the baking sheet. Put the baking sheet back in the over and cook for 25 minutes until it becomes crispy.

The original recipe is by Lizzie Fuhr and can be seen on www.popsugar.com

So what do you think? Game to try? Let me know your thoughts by commenting below or if there is any other recipes you guys want me to try! I'm open to ideas :)